Input Manager
The Inventory Engine comes with its own Input Manager, to avoid clutter and separate it from the rest of your input management. Of course you can also decide to implement input differently, and call its various methods directly from your scripts, but this just makes it autonomous and ready to use.
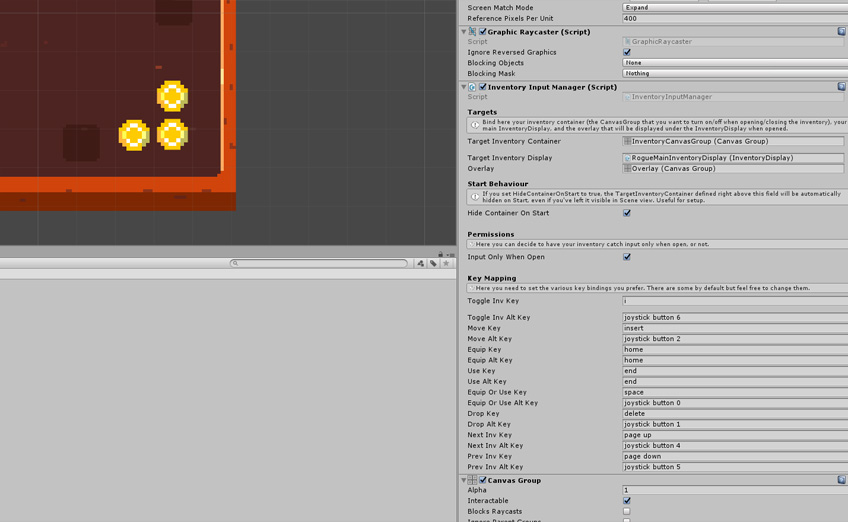
Usually placed at root level on top of the dedicated Inventory Canvas, the InventoryInputManager component will require you to bind it to an inventory group, that will get shown/hidden when you press the open/close keys. Usually you’ll want to put inside that group your main inventory and inventory detail panels. There are examples of that in the PixelRogue demos. You’ll also need to bind (via drag and drop) your Inventory Dislay and an optional overlay to show/hide between your scene and your inventory GUI for better readability.
You’ll then need to decide whether or not you want to hide your inventory container on start (hiding it even if you’ve left it visible in your scene view), and whether or not you want to authorize inventory input only when it’s open (which is usually the case).
The last thing you’ll need to do is, for each action (move, equip, use, equip or use, drop, next inventory, previous inventory), specify what key bindings you want to use. You can specify an alt binding for each, allowing you to support keyboard and gamepad at the same time. All inventory panels are mobile ready so they just work via touch by default.
Using the “new” Input System
The Inventory Engine can be used with Unity’s “regular” input manager, or the new input system. If you decide to go for the latter, here are steps to do so :
- create a new empty project in 2021.3.16f1
- from the package manager, import Inventory Engine v3.2
- from the package manager, import Input System 1.4.4, when asked if you want to enable backends, select yes. You may want to also ensure that ActiveInputHandling (in your Player settings) is set to InputSystemPackage
- after the restart, open the PixelRogueRoom1 demo scene
- select the InventoryCanvas, and setup whatever keys you want to bind mappings to in the InventoryInputManager’s inspector
- press play, press the key you bound to ToggleInventoryKey, notice the inventory opens