Items
Items are central in the Inventory Engine, as they’re what you’ll fill your inventories with. You’ll be able to add and remove them, move them around, inside an inventory or from one to another, use them, equip them, drop them, and more. You’ll also be able to have actions happen when any of these actions happen.
Creating an item is a simple process, but there are a few things to consider, as it’ll usually imply creating or using a few objects:
- an item script, a scriptable object that will specify what happens when the object gets picked, equipped, dropped, etc. This is optional as most of the time you’ll use the same scripts for a lot of objects.
- an item, a scriptable object instance that will contain the definition of your item, its properties. This is the only mandatory part
- a picker item, optional, that you’ll place in your scene, and that will allow you to grab the item and place it in your inventory
Throughout the system, items will be referred to via their ItemID, so you’ll want to make sure it remains consistent everywhere you reference your item (item name, ItemID, etc).
Item scriptable object scripts
The Inventory Engine uses scriptable objects to represent and manipulate items. You can learn more about Scriptable Objects in Unity’s doc if you want, but it’s not mandatory to have fun with the engine. All you need to know is that they are data containers, that can be attached to game objects in a scene. They’re also very helpful when it comes to saving and loading data. Items will be instances of these scriptable objects.
These scriptable object scripts will define what these items are, and what should happen when they get equipped, used, etc. You’ll usually need a different script for each type of object : armor, weapon, health bonus… But you won’t need to create one for each item. Your plate armor, leather armor and dragonscale armor will be able to share the same Armor script, they’ll only be different instances of that same script, with different properties.
The InventoryEngine comes with a few examples of item scripts that you can reuse, modify or copy for your own uses. They’ll show you how you can create your own in a few lines of code :
- BaseItem : this is the class that all other scriptable objects will inherit from. BaseItems don’t do anything, they’ll just describe the basic properties of an item : name, description, quantity, icon, etc. You can use that class for collectibles and objects that don’t do anything special apart from being picked and stored.
- ArmorItem : a BaseItem with info about the armor value of the object, and methods to change the character’s sprite when equipped/unequipped. These methods only work for the PixelRogue demo of course, you’d have to adapt them to suit your own needs.
- BombItem : a BaseItem that will output a debug line when used, to show the bomb was used. It’s just an example of how usable objects work.
- HealthBonusItem : same as the bomb, showcases how to setup a health usable object.
- WeaponItem : similar to the ArmorItem, will modify the appearance of the character when equipped/unequipped.
These classes are very generic and only meant as examples to show you how to create your actual classes. If you own the Corgi Engine though, you also get ready to use item classes, that will work directly with the Corgi Engine. They all have InventoryEngine in their name so it’s easier to differentiate them from the regular versions of these classes, that can’t be stored and usually trigger their effects when picked. There are four of them :
- InventoryEngineHealth : Allows you to create objects that will give health to the main character. You can define the amount of health you want.
- InventoryEnginePoints : Allows you to create objects that increase the player’s current score when picked.
- InventoryEngineTimeModifier : A usable object that will modify the current time scale for the specified amount and duration, when you decide to use it.
- InventoryEngineWeapon : Will allow you to create pickable and storable weapons of any kind.
Creating an item
Once you’ve created your inventory scripts, or if you’re happy with the existing ones, you can start creating actual items, instances of these scripts. It’s important to note that item instances need to be placed inside a Resources folder, as they’ll be read at runtime. By default, the Inventory system will look for items inside the Resources/Items/ folder (Resources folders are special folders in Unity that allow for runtime data load). Make sure you put your item definitions inside Resources/Items/ folder. Creating an item instance is very easy, all you have to do is go into a Resources subfolder (again, by default : Resources/Items), right click, Create > More Mountains > InventoryEngine or CorgiEngine > the type of item of your choice. You then need to give a unique name to that instance. That name will be used to reference it throughout the InventoryEngine. No spaces, no weird characters.

Then, in its inspector, you can define its properties. Here we’ll only consider the BaseItem properties, that are common to all item types :
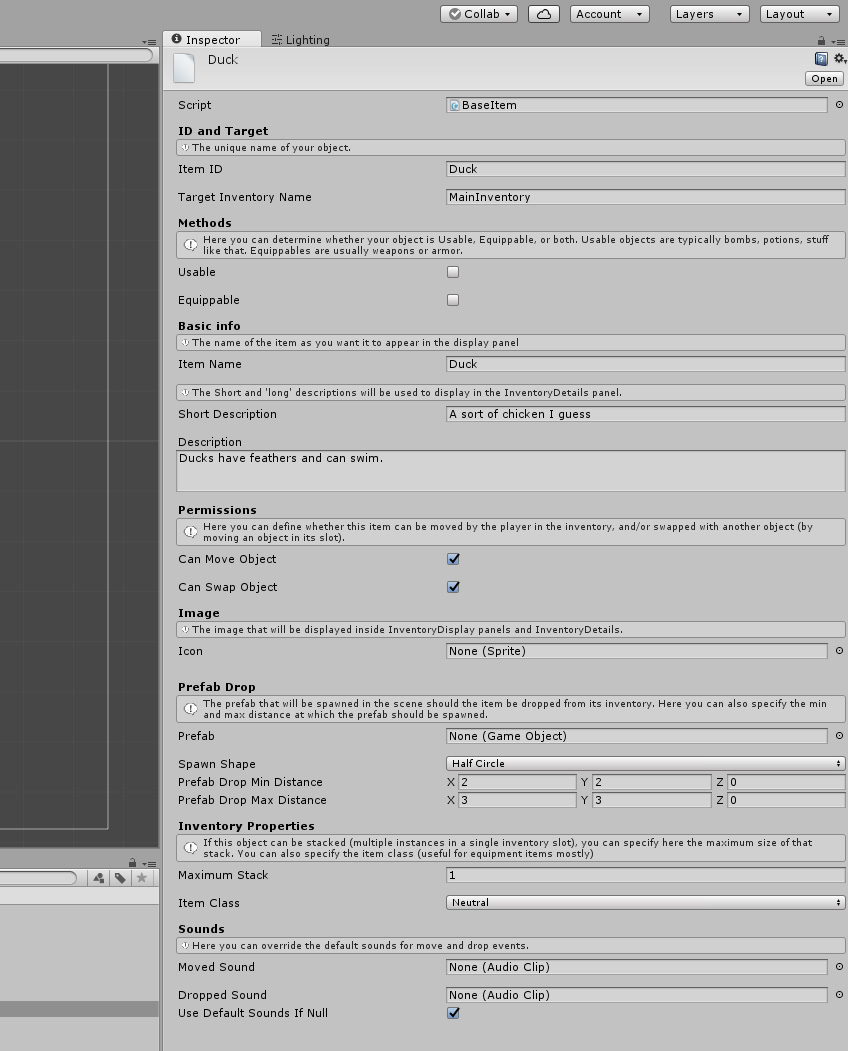
A few things to remember : the ItemID needs to be the same as the object’s name you just defined. The TargetInventoryName must match the name of one of your actual inventories. It’s the inventory in which the item will be placed when picked.
As you can see, this inspector also allow us to define an icon, that will be displayed in the inventory, and a “prefab drop” : an item that will be spawned in the scene if we decide to drop our item. It’s usually the same prefab that will be used to pick the item, the Item Picker, but you can specify another one if you want. As a lot of fields in the Inventory Engine, it’s optional, if you don’t want to be able to drop objects for example.
Item picker
You now have an item, that can already be stored, potentially used and equipped. But in most situations, you’ll need an object in your scene that you can pick to actually add the item to the inventory. In the Inventory Engine, such objects are called Pickers. They are usually comprised of a sprite or mesh renderer, a Collider2D (circle, box, whatever), and a Pickable Inventory Item component. This component will look for collisions with a Player object, and if there’s one, will handle removing the picker from the scene, and adding the specified object into the inventory. You can also specify a quantity, for a pile of coins for example, where picking one pile of coins on the ground grants you 150 coins.
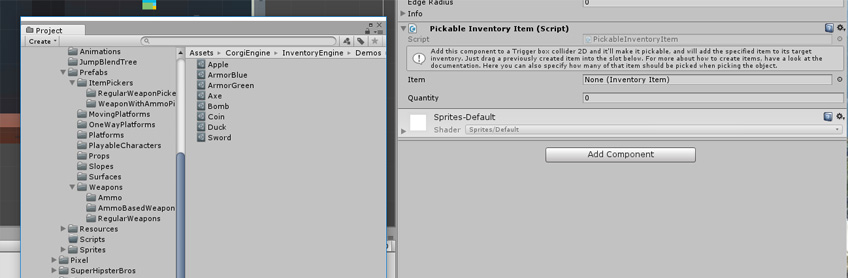
Once you’ve added a Pickable Inventory Item component to your object, you need to bind an item instance to it. This can be done by dragging and dropping the item instance you created at the previous step into the Item field of the component. This should be the result :
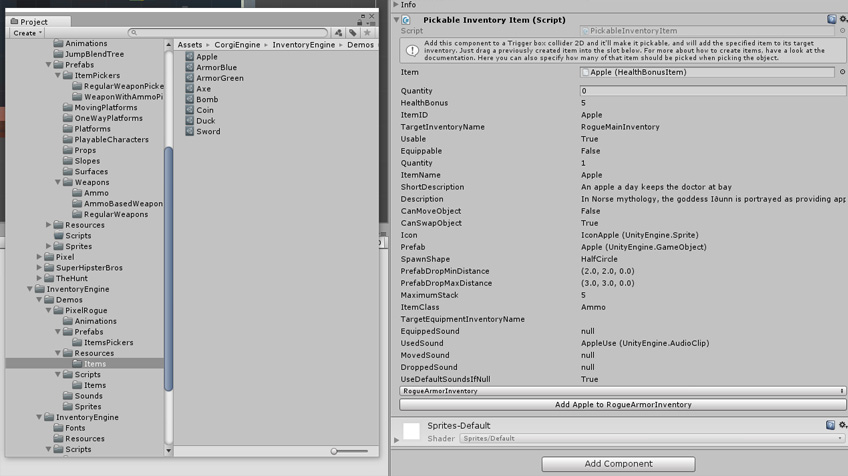
Once bound, the component displays a readonly list of the item’s properties, so you don’t have to go back and forth between item instances and pickers to remember the description for example. This item can then be placed in your scene, ready to be picked by your character. This will work out of the blue in the Corgi Engine, but if your game doesn’t use 2D colliders for example, you’ll need to modify or extend the PickableInventoryItem class to adapt it to your own specifications. From its inspector you can press a debug button to add items at runtime to test your picker without having to walk up to it.
Note that you can have more than one Item Picker component attached to an object. A good example are weapons, where when picking a gun you usually want the player to grab a few ammo with it. So you’ll have on Item Picker component bound to your Gun instance, and one Item Picker component bound to some Bullets instance.